c
How to Add Plugins to Ableton Live in 3 Steps
Plugins are an excellent tool for producing in any home studio.
If you are trying to install a plugin and make it work in Ableton Live, you should read this tutorial.
We will explain how to add plugins to Ableton Live, both on Windows and macOS.
How to Add Plugins to Ableton Live in 3 Steps

1. Install the plugin
The first step in adding plugins to Ableton Live is to install the plugin.
Some plugins come with an installer (exe on Windows or dmg/pkg on Mac), and others come without an installer.
If the plugin has an installer, you just have to run it and follow the steps.
If it doesn’t have an installer, then you have to manually move the plugin files to the indicated folder, depending on the version of your plugin and operating system.
On Windows, the default folders to move VST and VST3 plugins are:
VST: C:/Program Files/Steinberg/VstPlugins
VST3: C:/Program Files/Common Files/VST3
If the folders don’t exist, you can create them.
Clarification: On Windows, VST plugins have “dll” extension, and VST3 plugins are “vst3”. Still, it’s better to move the entire folder provided by the plugin manufacturer to the default location to work well.
On macOS, the default folders for VST, VST3, and AU plugins are:
VST: Library/Audio/Plug-Ins/VST
VST3: Library/Audio/Plug-Ins/VST3
AU: Library/Audio/Plug-Ins/Components
Clarification: On macOS, VST plugins have “vst” extension, VST3 plugins are “vst3”, and AUs are “component”. In Catalina and later versions, macOS often blocks plugins when you install them manually. Osiris Guitar found a solution for this; you can read his article here.
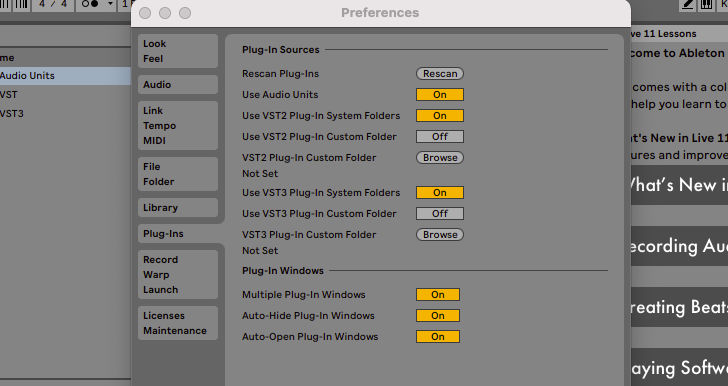
2. Configure folders in Ableton
Now open Ableton, and if you are in Windows, click on “Options” and “Preferences”. On macOS it’s “Live” and “Preferences”.
Go to the Plug-Ins section.
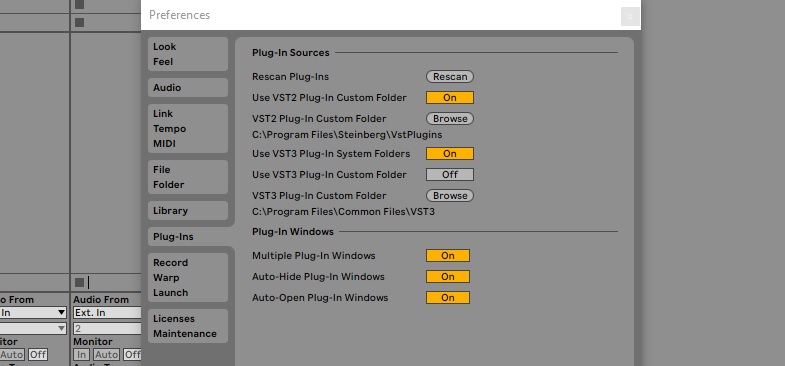
In Windows, you must switch to “On” the option “Use VST2 Plug-In Custom Folder” and set the folder C:/Program Files/Steinberg/VstPlugins. For VST3 plugins, you simply have to set the “Use VST3 Plug-In System Folders” option to “On”, and you’re done.
On Mac, you must enable the “Use Audio Units”, “Use VST2 Plug-In System Folders” and “Use VST3 Plug-Ins System Folders” options. That’s it on macOS.
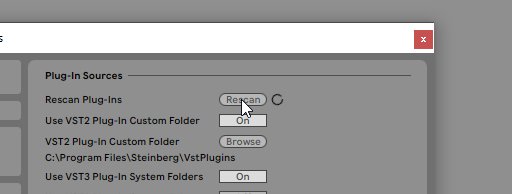
3. Rescan the plugins
Once we have all the default folders set, click on “Rescan” and Ableton will start scanning all these folders with the plugins.
Ready, you have your VST, VST3, or AU plugins working in Ableton Live.
Recommendations: VST vs. VST3
One of the things you might be wondering is which version is better, VST or VST3?
And the winning answer is VST3.
The VST3 version is the successor to VST, and the important thing is that they consume less CPU. This is because they only are active when the plugin is being used. There are also have other considerable improvements.
But at the end of the day, don’t use VST plugins (also known as VST2).
Just use the VST3 and forget about VST2.
If you’re on macOS, you can consider both VST3s and AUs. But if somehow you have to send the project to a friend who uses Windows, it will be easier with VST3; because both systems use it.
Final thought on how to add plugins to Ableton Live
The key for Ableton Live to detect your plugins is to tell it in which folders to look for them.
So selecting the default folders in Ableton’s settings is the easiest way to do it.
On the other hand, in versions of macOS Catalina and later, it can be tedious if you install the plugin manually, but it has a solution.
If you are looking for more plugins to produce, you can take a look at the plugins we have at ZAK Sound.
 We use cookies to enhance your experience, analyze site traffic, and personalize content. By accepting, you help us show you more relevant offers and improve your overall experience.